Tuesday, April 26, 2011

How to create symbols storage.

    With this post I want to start a series of articles about WinDbg and how to analyze dump files. As you known the secret of effective debugging is using the correct symbols. If you are writing managed code, without symbols debugging is not be possible. Working without symbols over unmanaged code, you may not get clear call stacks - it requires FPO data from the PDB file.
    MSDN contains information about how to create symbols server, but  there not discuss the most important: how to fill the server characters and binary files. If you want to arrive nirvana you need make next actions.
    You should have server with access of any person working on your project. You will probably want to call the server as \\SYMBOLS. :) I will use this mane of server. Create two shared folders titled OSSYMBOLS and PRODUCTSYMBOLS.
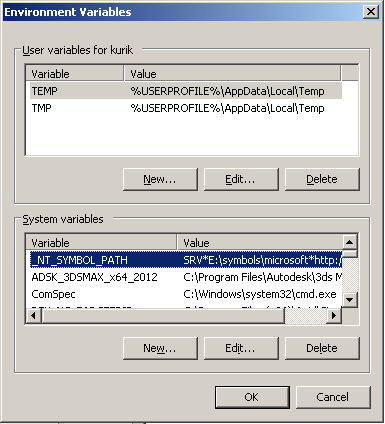
    Next step - install "Debuging Tools for Windows". After installing Debugging Tools for Windows you should create environment variable _NT_SYMBOL_PATH and assign it the next value: 
SRV*\\Symbols\OSSymbols*http://msdl.microsoft.com/download/symbols;
SRV*\\Symbols\ProductSymbols

    _NT_SYMBOL_PATH will be indicate WinDBG, where to look for the symbols. In this string we have two symbol servers, separated by semi: one for the symbols of the OS and another for the symbols of your program. SRV letters at the beginning of both parts of the line  indicate the debugger to load library SYMSRV.dll and pass it a value placed after the SRV. In the case of the first symbol server you are reporting SYMSRV.DLL, that the symbols OS will be stored in the directory \\Symbols\OSSymbols; after next star is the HTTP address, which SYMSRV.DLL will be used to load any symbols that are absent in the symbol server. This section of the variable _NT_SYMBOL_PATH provides updated symbols of OS. The second part of the variable _NT_SYMBOL_PATH said library SYMSRV.DLL that the specific symbols of your program should be sought only in the shared directory \\Symbols\ProductSymbols. If you want to specify different search paths, you can add them to a _NT_SYMBOL_PATH, separated by semi.
    So, the next string indicates that the search for your programs symbols also occurs in the system folder System32:
SRV*\\Symbols\OSSymbols*http://msdl.microsoft.com/download/symbols;
SRV*\\Symbols\ProductSymbols;c:\windows\system32


    Symbol server is a database that uses file system to find filesThe root directory is called OSSymbols, and all the symbol files, such as ADVAPI32.PDB, located on the first level. Under the name of each file is a directory whose name matches the date/time stamp, signature and other information necessary to definition a specific version of a file. Remember: if you have multiple options file (for example, ADVAPI32.PDB) for different OS versions, you will have a few directories that correspond to each option.
    In the next article I will talk about how you can fill your symbol server.

Monday, November 15, 2010

Implementation of the ICommand interface for reuse.

    If you use MVVM (model-view-viewmodel) pattern, the most commonly used mechanism is the binding to action in the View using commands. To assignment the command needed to implement an interface ICommand. It's simple, but it will need to do again and again.

    The idea - creating a universal command that takes two delegates: one is called when ICommand.Execute (object param) invoked, the second checks the status of whether you can execute the command (ICommand.CanExecute (object param)).

    Requires the method to switching event CanExecuteChanged. It is called from the user interface elements for switching the state CanExecute () command.

public class ModelCommand : ICommand
{
    #region Constructors

    public ModelCommand(Action<object> execute)
        : this(execute, null) { }

    public ModelCommand(Action<object> execute, Predicate<object> canExecute)
    {
        _execute = execute;
        _canExecute = canExecute;
    }

    #endregion

    #region ICommand Members

    public event EventHandler CanExecuteChanged;

    public bool CanExecute(object parameter)
    {
        return _canExecute != null ? _canExecute(parameter) : true;
    }

    public void Execute(object parameter)
    {
        if (_execute != null)
            _execute(parameter);
    }

    public void OnCanExecuteChanged()
    {
        CanExecuteChanged(this, EventArgs.Empty);
    }

    #endregion

    private readonly Action<object> _execute = null;
    private readonly Predicate<object> _canExecute = null;
}

Wednesday, August 4, 2010

Microsoft Ribbon for WPF

I am pleased to inform you of the final release of Microsoft Ribbon for WPF. You can download the installer for this release here.


This is great news for Windows developers looking to build rich, fluent user experiences. From the MSDN documentation:
The ribbon is a command bar that organizes the features of an application into a series of tabs at the top of the application window. The ribbon user interface (UI) increases discoverability of features and functions, enables quicker learning of the application, and makes users feel more in control of their experience with the application. The ribbon replaces the traditional menu bar and toolbars.
In short, this control library gives you the ability to incorporate a ribbon user experience in your applications today.


For Windows developers, the ribbon provides a rich experience that you can incorporate quickly and easily for your WPF applications. What’s particularly cool about the Microsoft Ribbon for WPF is that it’s a control library that’s built 100% in pure WPF goodness.


File → New Project...
After downloading and installing the Microsoft Ribbon for WPF, you’ll find the WPF Ribbon Application project template listed for both Visual C# and Visual Basic:


This project template provides you with a very simple example to help get you started:


For a deeper examination of the XAML and control library that’s used to build this application, I strongly recommend that you read Pete Brown’s excellent summary of this release in a post entitled,Announcing: Microsoft Ribbon for WPF. Pete also provides an important point (with emphasis added):
The new ribbon control is compatible with WPF 3.5sp1 and WPF 4. This is a 100% WPF implementation, not a wrapper around native code. That means you get all the great WPF styling capabilities for the new control.
This fact cannot be underscored enough. A true WPF implementation means that you can incorporate styling and rely on assumed WPF functionality (i.e. RibbonButton support the ICommand interface – wahoo!). Having built my fair share of WPF applications in the past – in some cases, wrestling with control interop and styling issues – I love this news.
So, what are you waiting for? Download Microsoft Ribbon for WPF today and start incorporating it into your applications!
Related Links
PS: If you building applications with Windows Forms, check out Windows Ribbon for WinForms project on CodePlex.

Saturday, July 24, 2010

Debugging WPF Binding

  WPF implements the mapping of data models using {Binding} expression. However in some cases there may be difficulties with understanding that the value was received as a result of binding. In this article I want to talk about a possible decision to enable the debug mode to see the used values. The solution is not new and probably many about it know, but for those who started working with WPF it might be useful. The essence of solution lies in the fact that the binding is carried out not directly but through a simple converter that does nothing to transform, but allows you to set Breakpoint while debugging and see the value of object that used.
using System;
using System.Windows.Data;

namespace WpfApplication
{
  public class EmptyConverter : IValueConverter
  {
    public object Convert(object value, Type targetType, object parameter, CultureInfo culture)
    {
      return value;
    }

    public object ConvertBack(object value, Type targetType, object parameter, CultureInfo culture)
    {
      return value;
    }
  }
}

  This is how data binding is implemented to the element. It creates an object converter and used in the {Binding} expression.
<Window x:Class="WpfApplication.TestWindow"
    xmlns="http://schemas.microsoft.com/winfx/2006/xaml/presentation"
    xmlns:x="http://schemas.microsoft.com/winfx/2006/xaml"
    xmlns:local="clr-namespace:WpfApplication"
    x:Name="Window">
 
  <Window.Resources>
    <local:EmptyConverter x:Key="EmptyConverter"/>
  </Window.Resources>
 
  <Label Content="{Binding Path=TestField, ElementName=Window, Converter={StaticResource EmptyConverter}}" /> 
</Window>


Tuesday, July 13, 2010

NullToBoolValueConverter for WPF

  You can enable or disable WPF elements based on if they are null or not. This is not supported, but you can create a simple value converter.
  /// <summary>
  /// Converts null to boolean.
  /// </summary>
  /// <remarks>
  /// If parameter is not specified or specified with null:
  /// if passed value is null then true is returned, otherwise false.
  /// If parameter is specified then inversion is done:
  /// if passed value is null then false is returned, otherwise true.
  /// </remarks>
  [ValueConversion(typeof(object), typeof(bool))]
  public class NullToBoolValueConverter : IValueConverter
  {
    public object Convert(object value, Type targetType, object parameter, CultureInfo culture)
    {
      bool result = value == null ? true : false;
      if (parameter != null)
        return !result;
      return result;
    }

    public object ConvertBack(object value, Type targetType, object parameter, CultureInfo culture)
    {
      return value;
    }
  }


  This value converter allows me to bind to any property taking a boolean argument with the following syntax in XAML.
<local:NullToBoolValueConverter x:Key="NullToBoolValueConverter"/>

<ComboBox.IsEnabled>
  <Binding ElementName="TetsComboBox" Path="SelectedItem" Converter="{StaticResource NullToBoolValueConverter}" ConverterParameter="true" />
</ComboBox.IsEnabled>